Setting Up Your Server
Make sure to read the assignment description thoroughly. For this assignment, you will have to build a NodeJS app. You will develop your code on your own machine for your convenience, and launch it in the server. App should run both locally and on the server.
To get started on your own machine, download and install NodeJS. Use the lecture slides, official NodeJS documentations, or tutorials available online on how to get started. W3schools has very straightforward tutorials.

For setting up your server, you will need:
- Your own solis-ID and solis-password (you use these to log in to all major University Utrecht services).
- Your groupname. This is the word group followed by your group number. So for example group 1 would be group01 and group 42 would be group42.
- Your server password. This is webtech2026 for all groups by default. Do NOT abuse this, only log into your own group.
- The portnumber of your group. This can be calculated by adding 8000 to your group number. So for example group 1 would be 8001 and group 42 would be 8042.
Prepare a Hello World Snippet
Before you get started with connecting to the server, you should make a file called main.js. In this file, insert the following content:
You should, of course, change PORTNUMBER to your actual portnumber. Once you did that, proceed to the following sections to upload it to the server.
Transferring Files using WinSCP
This is our recommended FTP-client. However it only works on Windows (as the name suggests). If you are on any other platform, we recommend Filezilla (see next section). After downloading and installing WinSCP, execute the following steps:
- Open up WinSCP and start a new session (this window should pop up if you open WinSCP for the first time).
- Click on New Site and fill in webtech.science.uu.nl as Host name, your groupname as User name and your server password as Password (recall that the initial password is webtech). Leave the rest as is.
- Open up Advanced and find Tunnel.
- Check the checkbox Connect though SSH tunnel and fill in gemini.science.uu.nl as Hostname, your solis-id as User name and your solis-password as Password. Leave the rest as is. This will setup a tunnel to the general server of the University Utrecht.
- You can now log in.
- Note that if you save your login data, but do not want to save your password both your server password and your solis-id password will not be saved.
You are now connected to your part of the server.On the left side of the screen, you will see your local filestructure. Navigate to the folder you saved your main.js in and drag it to the right side. This will upload it to the server. You now have your first file on the server! To get it running see Commands on the Server.
Transferring Files using Filezilla
If you are on a Windows machine, we recommend using WinSCP. If not, keep reading. Using Filezilla, you can not directly connect to your part of the server as you can with WinSCP, you will have to setup the tunnel separately. Fortunatly, this is not very complicated:
- Open the terminal/ command prompt.
- Type ssh -D PORTNUMBER -C -N solis-id@gemini.science.uu.nl (be sure to fill in your own portnumber and solis-id of course).
- You will be asked for your password, this is your solis-password.
- It will seem like the terminal gets stuck now, but it is not. It is simply holding open the tunnel. Make sure to NOT close the terminal and proceed.
Open Filezilla and configure it to use the tunnel you just created. Open Edit > Settings > Find Generic proxy (under Connection->FTP). Choose SOCKS 5 and fill in 127.0.0.1 as Proxy host and your own portnumber as Proxy port. Leave the rest empty.
On the top of the main screen: fill in webtech.science.uu.nl as Host, your groupnameas Username, your server password as Password (recall that the initial password is webtech) and 22 as Port. Click QuickConnect. Next time you log in on Filezilla, you can click the little arrow next to Quickconnect to find recent sessions. Note that you will have to re-open the ssh tunnel with the command prompt.
You are now connected to your part of the server. In the file explorer you will see a bunch of "hidden" files, just leave those as they are. On the left side of the screen, you will see your local filestructure. Navigate to the folder you saved your main.js in and drag it to the right side. This will upload it to the server. You now have your first file on the server!
Starting Your App
To execute commands on your part of the server (like starting it up), use ssh. ssh is default installed on Windows 10, MacOS and Linux. To log in to your part of the server follow these steps:
- Open a command prompt.
- Type ssh solis-id@gemini.science.uu.nl and fill in your own solis-password (it will not show up, that is a security feature, just keep typing). You are now inside the general server of the University Utrecht.
- From there, type ssh groupname@webtech.science.uu.nl and fill in your server password (recall that the initial password is webtech). You are now in your part of the server.
- If it is your first time logging in, change your password now by typing passwd groupname and following the on-screen instructions.
From here, you will be able to run standard ssh commands like ls and cd.
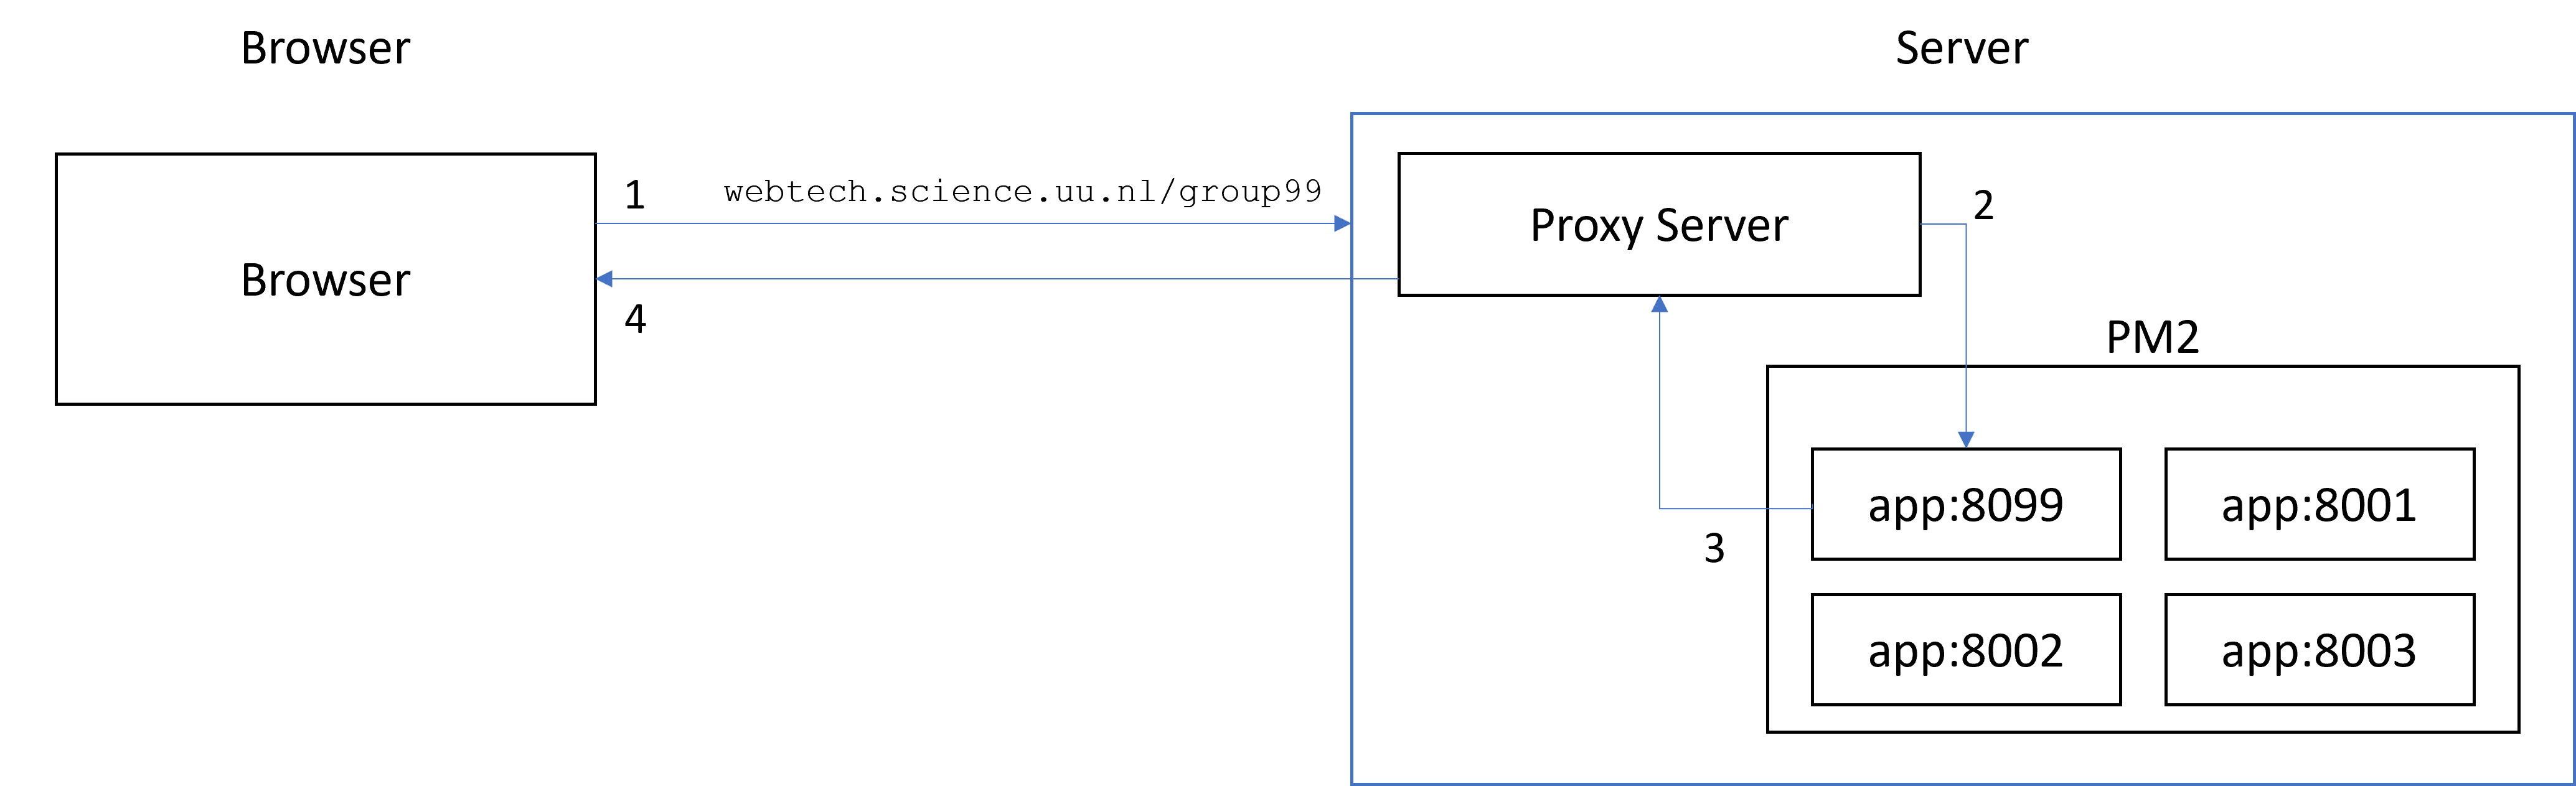
The server uses PM2 as a process manager that will handle all the projects. Assuming your main file would be called main.js you can start up your app with pm2 start main.js and stop it with pm2 stop main.js. Once your started up your app you should be able to see it on http://webtech.science.uu.nl/groupname.
When you are done with setting your program up on the server as described above, you can get started on making your own app. The instruction provided above are just a guideline to get you started. You are, of course, free to use any other method of uploading to the server if you want to do so.
Some recommended NPM packages are SQLite, AJAX and JSON or XML. You are also free to use other NPM packages.
Remember to change your password once everybody in your team has tested that the setup is working. Once you are inside webtech server, use the command passwd to set up a new password - make sure that everybody in the team knows the new password.